🧑🏾💻
What to do before the module starts
🧰 Install a UNIX based operating system
Learning Objectives
If you get stuck on any of the below or above instructions, please post in your class channel on Slack.
You probably already have this if you have done previous modules.
⚠️warning
Code Your Future does not support Windows.
We have found that we don’t reliably have volunteers at class who can debug Windows problems, and they frequently come up, stopping trainees from making progress.
We do not support Windows so as to not waste lots of trainee and volunteer time. We have made this decision even though Windows is a popular operating system and has features like WSL which help to get experience with Unix.
If you have a Mac or Linux machine already, you already have a UNIX based operating system. All CYF-supplied laptops run Mac OS or Linux. If you have your own machine and it runs Windows, you should already have set up a Linux partition.
If you have still not done this, you must do it now. We cannot support learners using Windows. It takes too much time from everybody else. If you need help doing this, post in Slack, or bring your laptop to a CYF co-working space to get support. It’s normal to need help with this process.
📋 Check Git installation
Learning Objectives
Git
You will use Git continually as a developer. We will cover Git in more depth later in the course. Right now, we will just check that you have it installed.
Open up a terminal and run the command git --version to double check you have Git installed.
If it is installed successfully, you should get a version number (which may not be exactly the same as this example, but should look similar):
git version 2.40.0
Otherwise, you will need to install it or ask for support on your Slack channel.
💡Tip
If you are working on a library computer, you do not have a terminal, but your github.dev account already has Git installed. (It’s called “Source Control”.) So you can skip this step.
🧰 Install VSCode
Learning Objectives
We use VS Code to write all of our code in the course. It is known as an Integrated Development Environment (IDE) and really helps you write great code.
💡Tip
If you are working on a library computer, use the online version of VSCode called Github.dev.
The interface is mostly the same, but you cannot install extensions or use the terminal. You can complete all the tasks in the onboarding module without these features.
📂 Create a work folder
Learning Objectives
📢Important
Make a folder called CYF
in your home directory. Store all your work for the course in this folder.
You’ll need to create a CYF folder to store your projects on the course. You can do this any way you like, but here we are using the terminal.
How to create a folder using the terminal
- Open a terminal on your computer.
For each of the steps below, you’ll need to use the command line in your terminal.
Use this cli documentation to remember terminal commands.
In your terminal, print your current working directory.
List the files and folders in your current working directory.
You’ll need a place to store your work for the course.
Make a new directory called
CYFin your home directory.Change directory into the
CYFdirectory.Double check you’re in the right place by printing your current working directory.
💡Tip
If you’re working on a library computer, skip this step. You will store your work in your GitHub account.
Youtube: Fork your Planner
Youtube: Make your Planning Board
🔗 Set up Planner
Welcome to your coursework planner
This is how you will plan and manage your coursework at CYF. You will add all your work as issues to your fork of this repository, and then use a project board to manage your work. This is broadly how all technical projects are managed, so you will need lots of practice. Get started today.
1. How to get set up
Forking the My-Coursework-Planner repo
- Fork this repo to your own GitHub
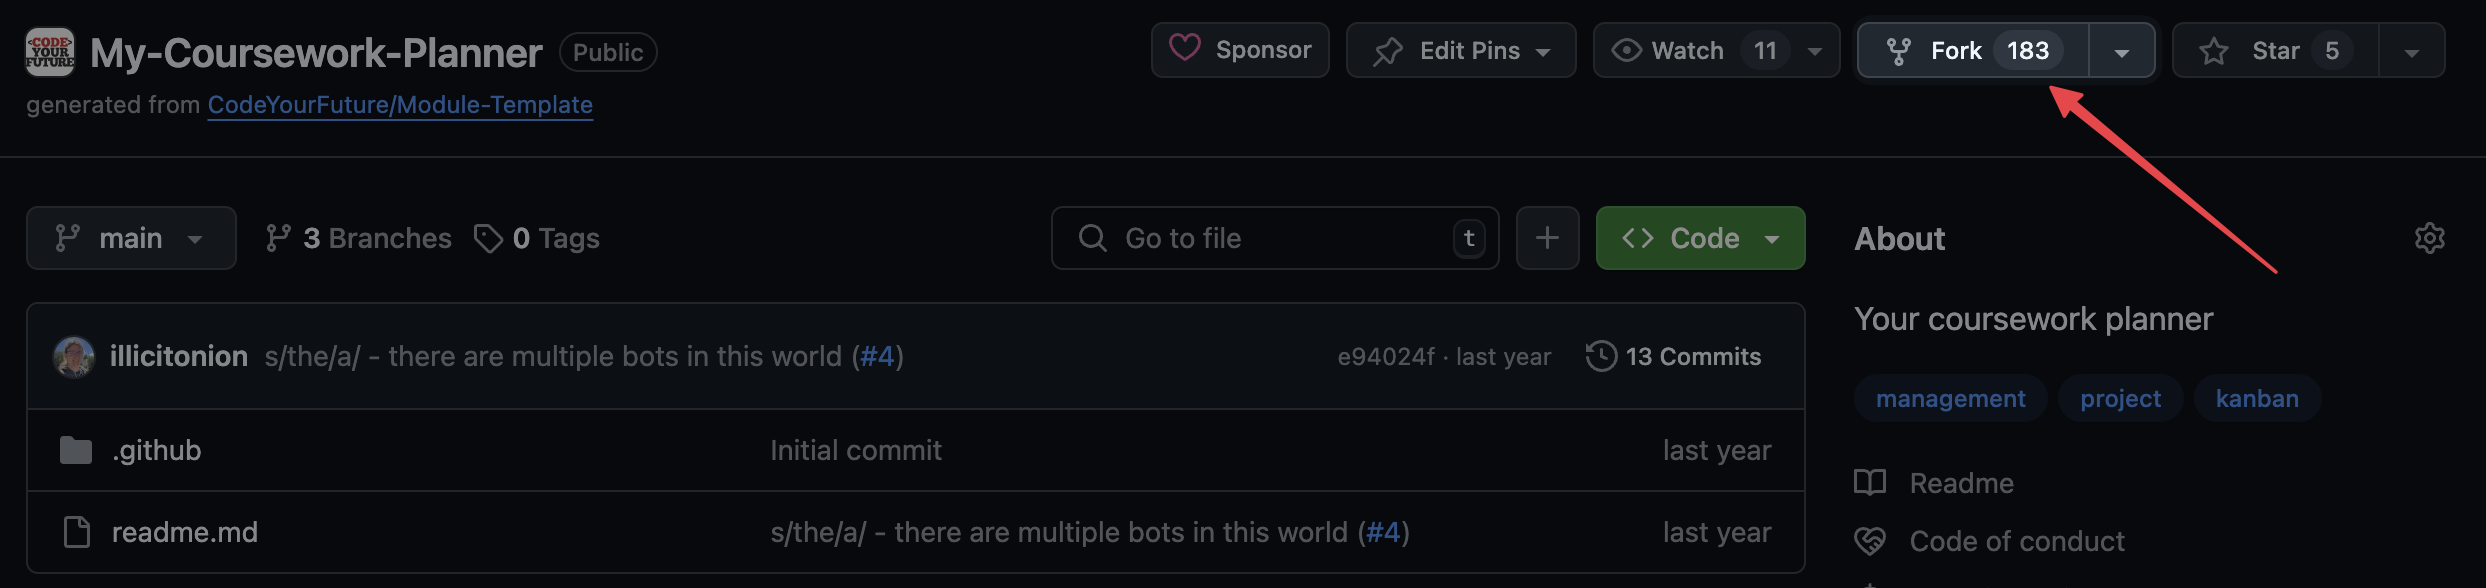
- You should see your own GitHub username under
Owner
- Turn on
issuesin theSettingsof your forked version of the repo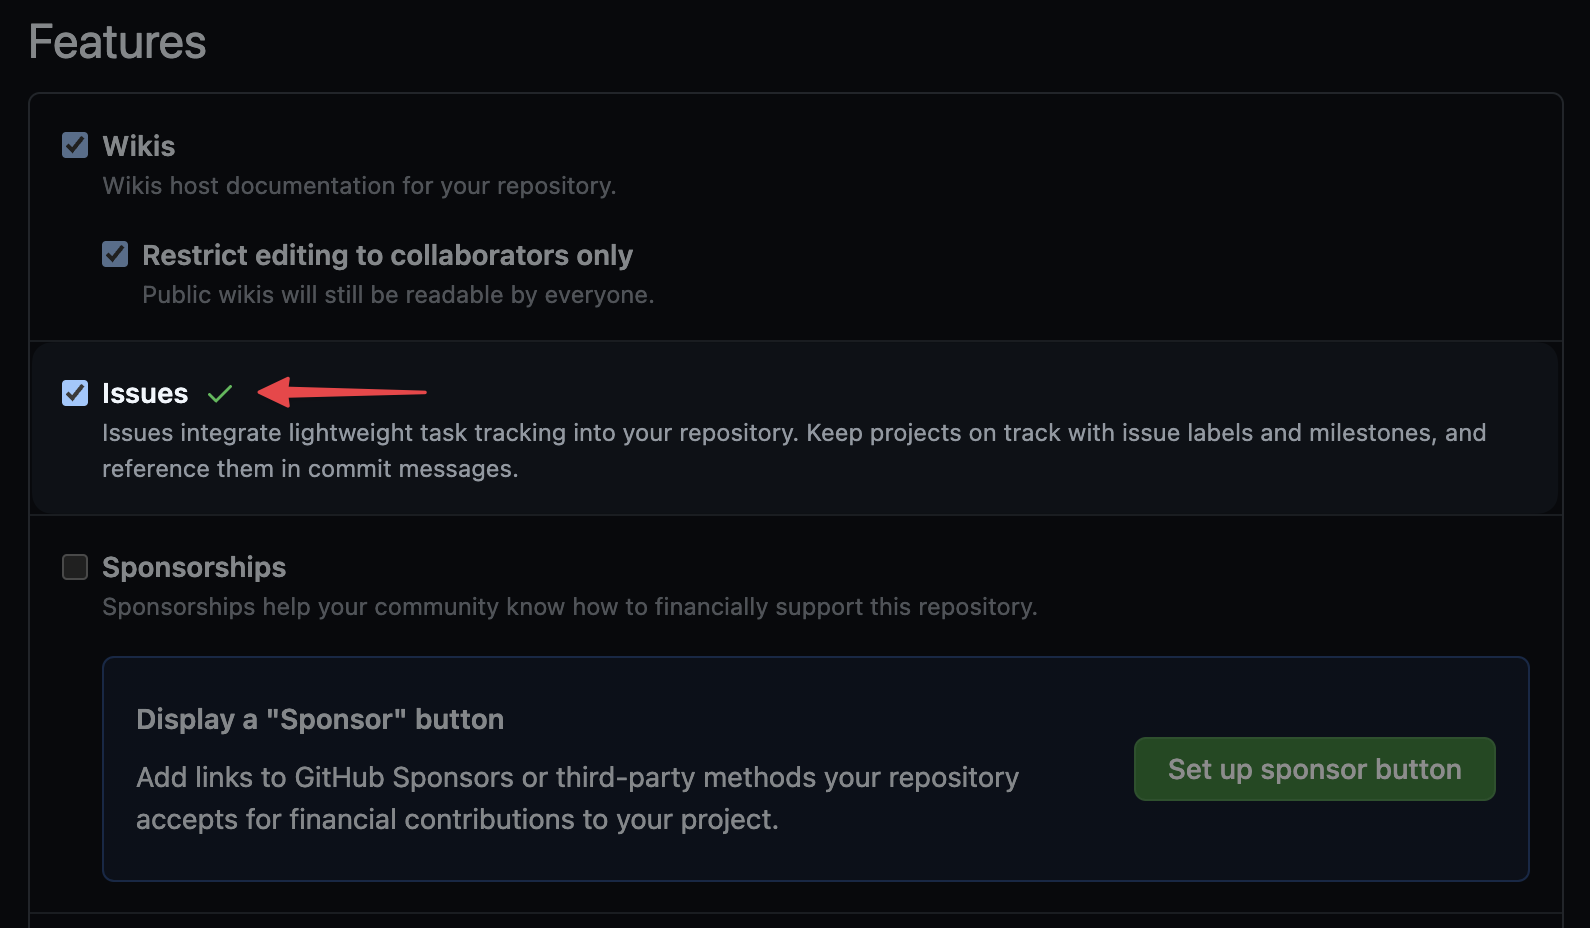
You must fork to your personal Github account. Forks created in the CYF org will be deleted by a bot.
Creating your project board
- Go to the example project board
- Click the three-dot menu, and then select
Make a copy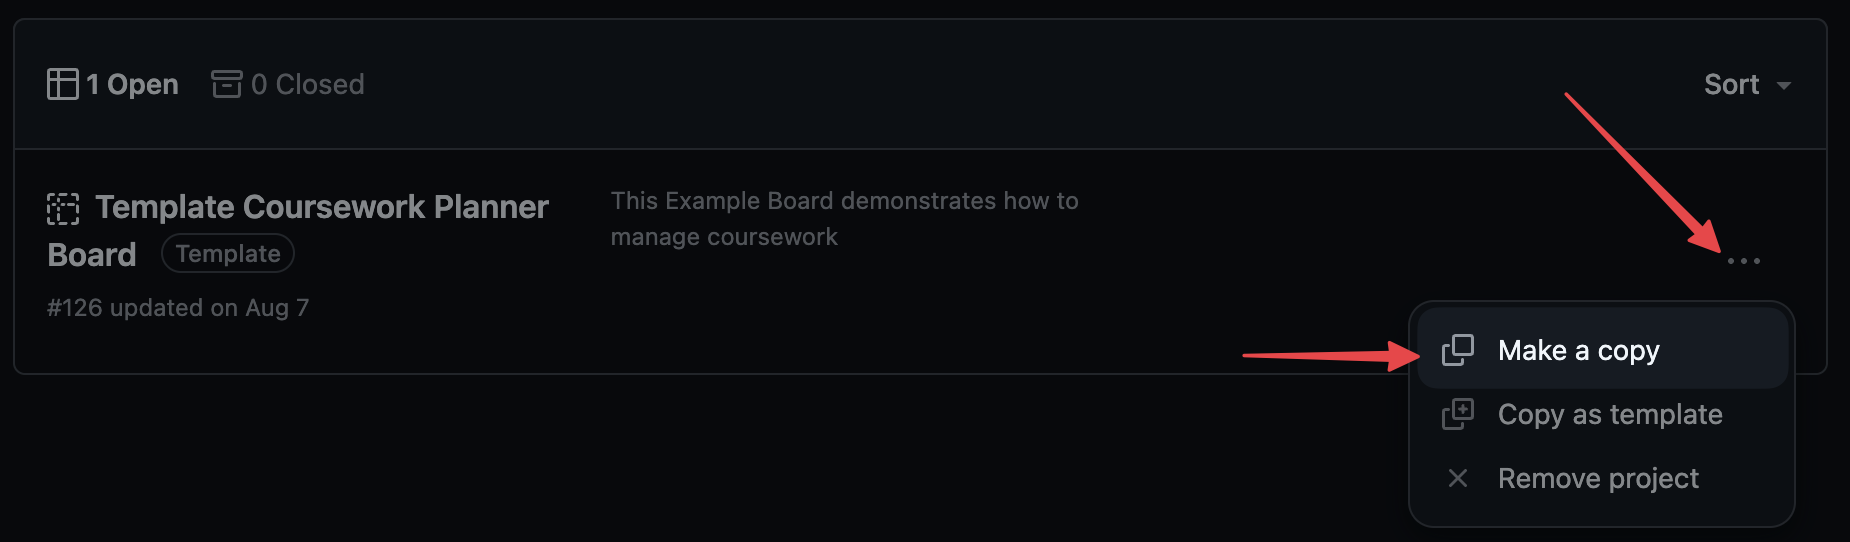
- Make sure your own GitHub username is under
Owner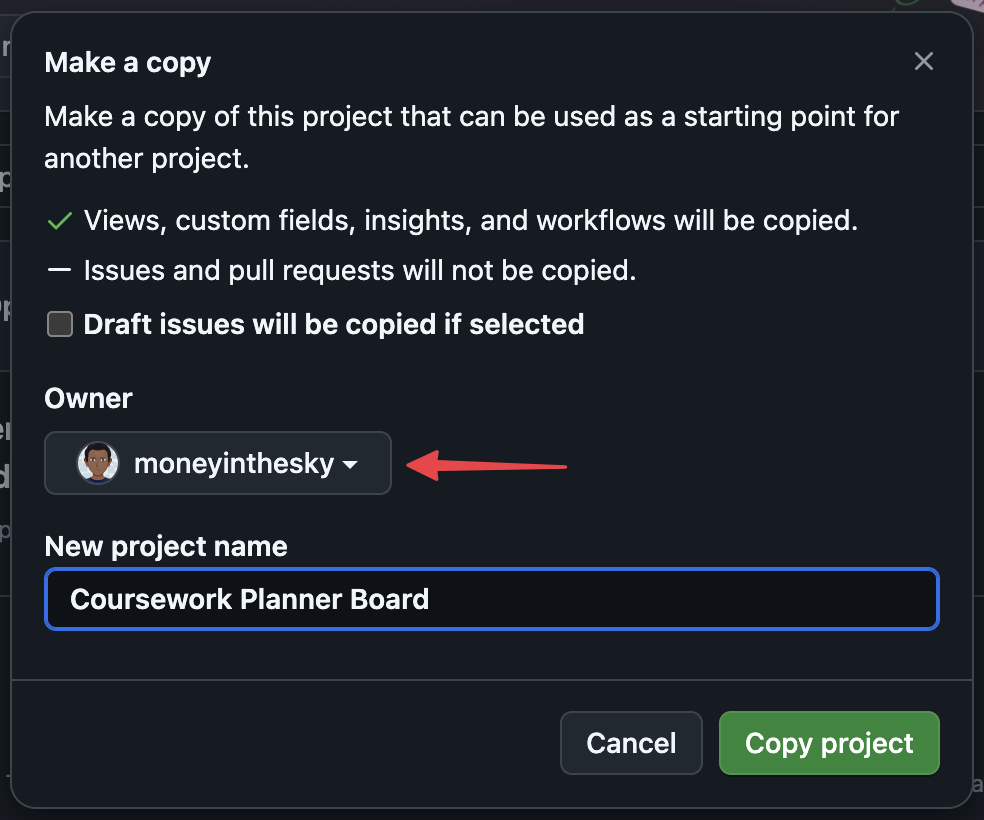
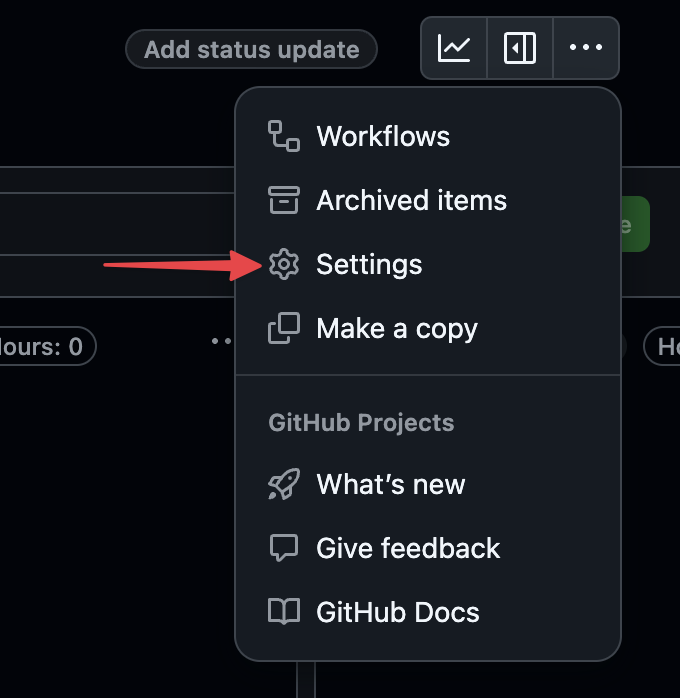
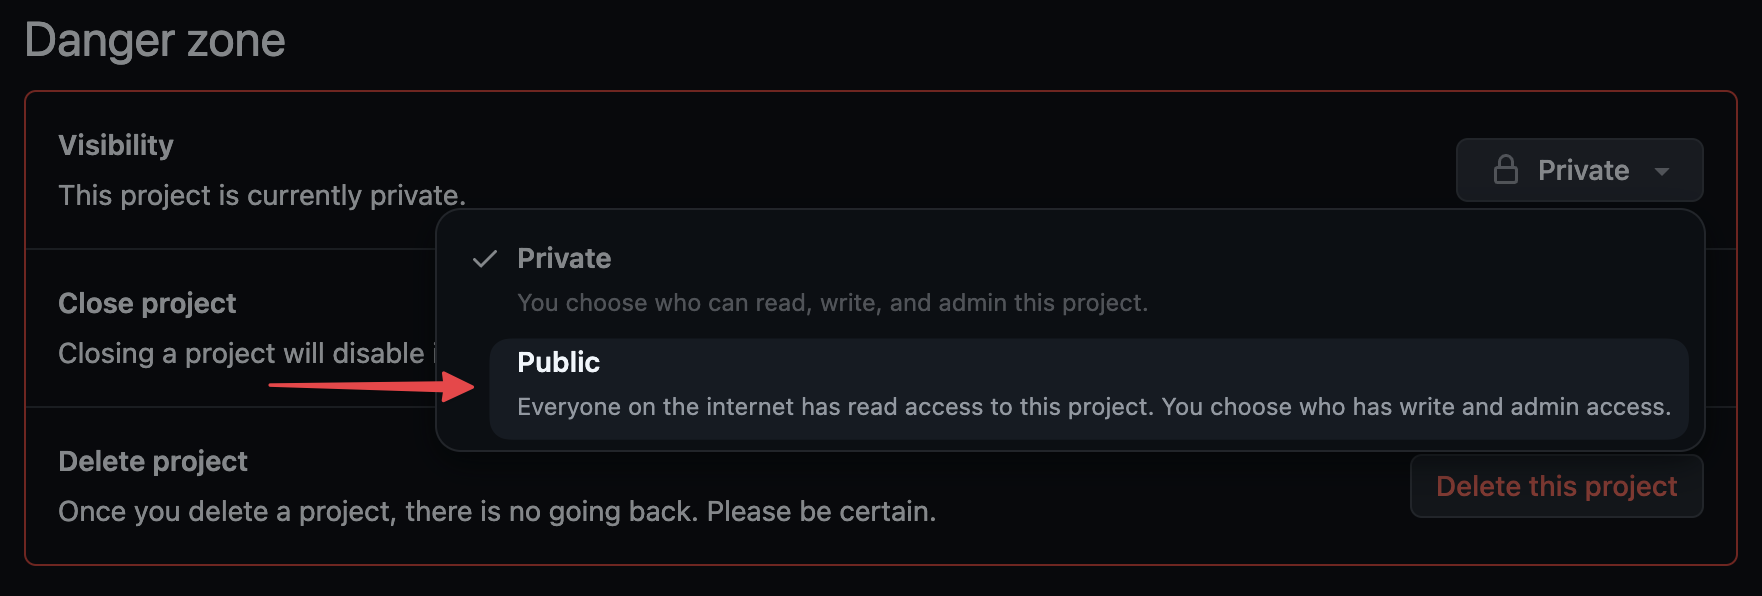
- Make your project board public so your mentors can see your progress - open the project board settings
- Scroll to the bottom to find the setting to make your board public
Linking the My-Coursework-Planner repo to your project board
- Go back to your forked version of the My-Coursework-Planner repo
- Under
Projects, clickLink a projectand select your project board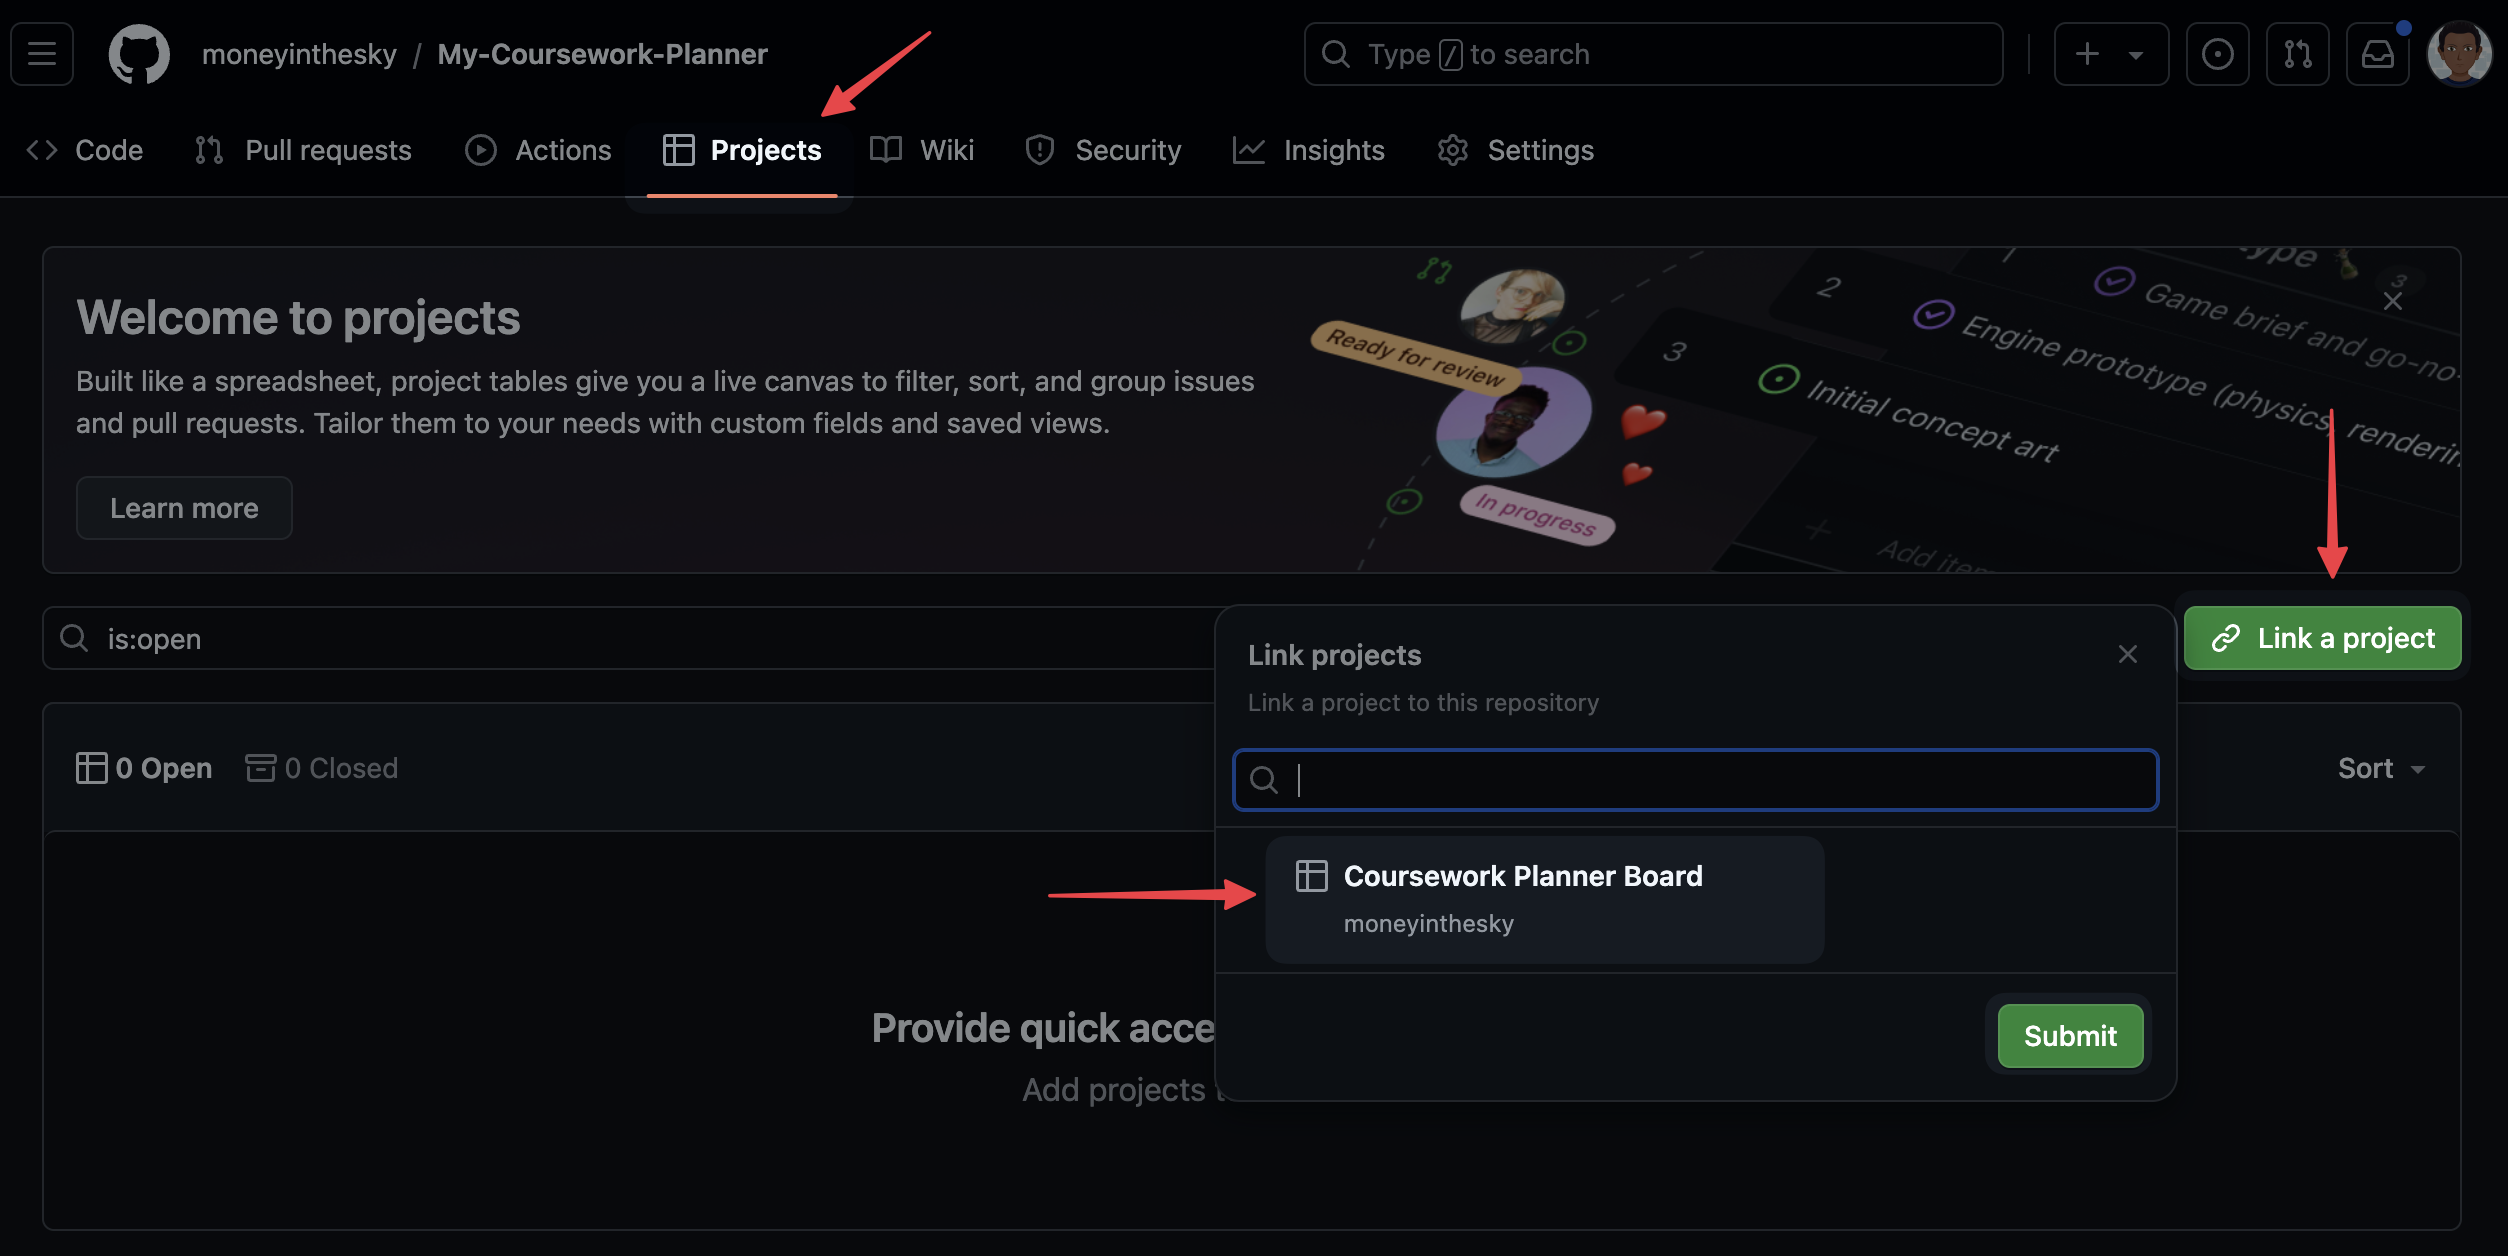
- That’s it! You’re ready to start adding issues to your board!
2. In every module, you will add your work as issues
Each sprint in each module has a Backlog page which lists the work you’re expected to do for that module. Every item in the list is actually a GitHub issue.
There is a “Clone” button next to each issue. When you’re starting a sprint, clone each of its issues into your coursework planner.
Copy issues for each week or at most for each module. The coursework content is updated frequently, you will not have the most up to date tasks on your board if you copy all modules at once.
If the Clone button isn't working, expand this for instructions of how to manually clone the issues
Each module has a module repo. The coursework for each module is added as issues to that repository. All the module repos are listed in the Table of Contents.
- Go to the module repo
- Click on the
Issuestab - Copy each issue from the module repo to your own coursework repo.
We have also used the Kamino Clone Button Chrome extension to make this easier, so you could try that.
3. Manage and adapt your project board as you learn
There are example project boards attached to each module, showing you ways you can use boards to manage your time, prioritise, scope, and track your work. You should use the same project board all the way through the course, and add to it as you go. Learn as you go, and adapt your board as you learn.
You can, and should, also add your own tickets to the board. Just remember it’s a public board, so don’t add anything you don’t want to share with your mentors.
You can watch this video about how to create your coursework-planner board.
🔁 Spaced Repetition
What are we doing now?
You’re going to use this prep time to answer some questions and schedule in times to review your understanding. In your planner or calendar, schedule a short (10 minute) review of your answers:
💡Space at increasing intervals
- One week from today
- One month from today
- Three months from today
- Six months from today
- One year from today
Do this now. Then move forward to working through as many of these questions as you can. (You may not complete them all, and that is ok.)
Write down your answers first and then update them after looking at the sample answers, if it’s useful to do so. Use all available tools to help you answer, and remember:
the point is not to complete the exercises the point is for you to secure your own understanding
Examples of tools you might use
🔁 Recap HTML and CSS
Learning Objectives
😶🌫️ What is HTML?
Learning Objectives
10 Things About HTML
What is HTML?
HTML stands for Hypertext Markup Language. Markup means tags that go around content like text, pictures, videos, to “mark up” or describe what they are.
HTML tags look like this: <p>This is a paragraph.</p>. They typically surround a piece of content, like a block of text, and describe it as such. In this case, the <p> tag describes the content as a paragraph.
What are some examples of HTML tags?
Examples of HTML tags include <mark>, <section>, <header>, and <button>.
What does it mean to nest HTML tags?
Nesting is like Russian dolls - or tupperware - a box in a box in a box. We nest tags inside each other. That’s how we write HTML. For example:
<article>
  <header>
    <h1>Title</h1>
  </header>
</article>
Here the <header> tag is nested inside the <article> tag, and the <h1> tag is inside the <header> tag.
Not all tags are nested, in this example:
<article>
  <header>
    <h1>Title</h1>
  </header>
  <p>Some content</p>
</article>
Both the <header> and <p> tags are nested inside the <article> tag, but the <header> and <p> tags are not nested inside each other - they are siblings.
What are some examples of web browsers?
Chrome, Firefox, Safari, Lynx, JAWS, Brave, Edge, Vivaldi, Opera…
Here’s an interesting question: what does HTML produce in the browser?
It produces what we see - it produces a visual representation of the document. But in a little more detail: the browser parses the HTML we write, executes the linked Javascript, loads the CSS, media, and other resources, and produces a model of our document, called the document object model. It produces an API called the DOM.
It uses all of this information to decide what to show us.
What is parsing?
Make sense of. Analyse syntactically.
What is syntax?
The rules that structure language, so it can be understood by someone else. I put words in an order, according to rules, I structure meaning and you can get that meaning back out if you know the same rules. Programming languages are the same - they each have a set of rules, they each have a syntax.
Think about HTML and CSS. They use different syntaxes.
For instance, when grouping together the information about an HTML tag, you may write: <h1 class="main-title">This is a title</h1> - there are several pieces of syntax here, and one is that the tag is opened by <h1> and its contents are done when you see </h1>.
In CSS, on the other hand, you may have a rule like h1 { color: red; } - we group together declarations applying to the selector between {}s.
HTML and CSS use different syntaxes, even though some of the concepts are similar.
What is an API?
API stands for Application Programming Interface.
Imagine you want to know what the weather is going to be tomorrow. You may have an app in your phone which can tell the weather, but it doesn’t know the weather everywhere - it will ask some service on the internet.
That service on the internet is an API. The service on the internet can be asked specific questions. Maybe it can be asked “What will the temperature be tomorrow in London?” or “Tell me the next week’s temperatures for every city in the UK?” or “When will it next rain in Glasgow?”.
And when you ask a question, you need to know how to interpret the answer. If you ask “When will it next rain in Glasgow”, and get back an answer of “5”, what does that mean? In 5 minutes? In 5 hours? It’s been raining for the last 5 days?
The service may have a lot of knowledge, but it can only be asked specific questions. And the app on your phone needs to know how to interact with it. “What can I ask/tell the API?”, “How do I ask/tell it those things?”, and “How should I interpret the answers I get back?” are all good things to think about when thinking about an API.
The DOM is an API. From our code, we can tell it things (like “All h1 tags should be blue”), and it will take action as a result. One of the ways we can interact with the DOM API is by giving it a CSS file - it will apply the CSS file when it’s working out how to display a page. The CSS specification helps us understand how we can interact with the API - what we can tell it, and how we tell it those things.
What is semantic HTML? What does semantic mean?
Semantics means meaning. Semantic HTML is meaningful code: each piece of data marked up with correct, that is to say, descriptive tags. A heading has an h1 tag. A button has a button tag. There are only two html tags that deliberately have no meaning (div and span).
These tags are then interpreted by APIs to give functionality to the page. A button tag is interpreted by the browser as a button, and so it can be clicked, or triggered in many ways. A heading tag is interpreted by the browser as a heading, and so provides a traversible page outline to a screen reader.
HTML tags are powerful because they are meaningful. They are meaningful because they are semantic. Semantic HTML is powerful HTML.
Why is semantic HTML important?
HTML tags are powerful because they are meaningful. They are meaningful because they are semantic. Semantic HTML is powerful HTML.
The better structured your document, the more meaning you can pack into it, the more powerful your code is, the better it will work in more contexts, and more things will be able to interface with it.
One place semantic HTML is useful is that if you use a <footer> tag instead of a <div> tag, a screen reader can understand that it is a footer, and treat it specially.
Another place it’s useful is that another programmer reading the CSS you’ve written can see a header { ... } block and know that you’re styling the header, rather than needing to work out what div.top { ... } means and applies to.
By using semantic conventions, we make it easier for everyone and everything to understand what we’re trying to express.
Youtube: CSS skills practice, optional
🎨 What Is CSS
Learning Objectives
10 Things About CSS
What is CSS?
Cascading Style Sheets are a language of style - a way to change how we visualise the DOM - using selectors, properties, and values in rulesets. They provide a way to change how a browser displays HTML.
A ruleset is made up of a selector and a list of declarations. A declaration is made up of one property and value pair. This is the syntax of CSS.
What is a selector, property, and value?
selector {
  property: value;
}
Rulesets look like this: p { background: red; }. The selector is the p in this case. This p selects all elements of the DOM tree called p and sets rules about how to show them. Selectors always come first in a ruleset.
A property is a quality, a characteristic. A value is the amount.
For a person, you might say their ‘age’ property has the value of 40. For an element, you might set the width property to the value of 100%.
Within a ruleset, multiple declarations may set values for properties, and each declaration ends with a semi-colon (;), e.g. p { background: red; color: blue; }.
How do you know what properties and values there are?
You learn them by using them. You look it up here: https://developer.mozilla.org/en-US/docs/Web/CSS/Reference. Another thing you can do is look at the autocomplete in Devtools.
Why is CSS a 'cascading' style sheet? What does cascade mean?
A cascade is a stream or sequence of a things where each thing affects the next. You might imagine pouring champagne into a tower of glasses. The champagne flows into the top container; it then cascades into the next container; etc. In CSS we’re actually pouring from many bottles into one tower.
So in CSS ’the cascade’ means the order or sequence of the rules as they flow into the DOM tree according to CSS precedence.
Several rules may apply to one element, and they are applied in a particular order, with later, more specific, or more important rules adding to or overriding ones that have already been applied.
What does precedence mean?
It means the order rules are applied.
One way rules are applied in CSS is inheritance: children inherit from parents. If a parent node has red text, all its children will inherit that red text color. But when another rule with higher precendence comes and overrules, it replaces the rule which had lower precedence. An explicit rule targeting an element directly overrules a rule it inherited from its parent.
Inheritance forms a hierarchy. The elements being styled are hierarchical - with children inheriting from (but perhaps overriding) parents.
Everything in CSS is determined by order. Order is so important in CSS because CSS is a declarative programming language that programs the layout of boxes.
CSS renders the nodes in our DOM tree as nested boxes, and we program their appearance using fonts, colours, and spacing.
What does declarative mean?
It means that we describe a set of rules, and all of the rules are processed and then applied, in a well-known order, in one go. The browser works out how to apply the rules. You don’t write for loops or if/else statements; there are no functions as such; you just declare the outcome with some rules, and those rules get applied.
In CSS you do the ‘what’, and the browser does the ‘how’.
What is specificity?
Specificity is a weighting system for CSS rules. The more specific your selector, the more power it has. For example: IDs can only ever mean one node. IDs are unique, so they are more specific than classes, which could mean many nodes.
Classes added to html element are more specific than just a plain element selector, as a class of p (e.g. p.instruction) is more specific than just all p. If you get two rules with the same specificity then the one that comes last in the order wins.
The browser sorts all your rulesets, or declarations, into a defined order according to the power, or weight, of the declaration and applies the result, like a game of cards where higher value cards beat lower value cards.
Stronger rules override weaker rules. Everything is sorted and sorted until eventually a final value wins out and the view is rendered.
This only applies where there is a conflict. If both p { color: red; background-color: blue; } and p.instruction { color: orange; } apply to the same element, the color will end up orange because it was specified in a more specific rule, but the background-color will still be blue because nothing overrode that property.
The browser sorts like this:
- Match the media
- Sort by origin
- Sort by specificity
- Sort by document order
Specificity forms a hierarchy. CSS rules are hierarchical - with more specific rules being applied after (and perhaps overriding) less specific rules.
What do we mean by order?
Order means ‘what comes first?’.
Another way to think of ‘earlier and later’ is ‘farther and nearer’. The closer the declaration is to the node in the DOM, the ‘later’ it is in the CSS. So an inline style overrides a style set in a style block, which overrides a stylesheet linked in the head, which overrides any stylesheet linked higher up in the head, which all ultimately overrides the user agent style that comes in the browser.
What does specify mean?
Identify clearly. Name explicitly.
What does render mean in context of a browser?
Render means to hand over, or to give back. In the browser, it means to show the result of all these computations we have talked about. It turns the code into pixels and paints them on your screen. So it’s the end result - how the page finally looks on your screen.
🔐 Professional Accounts
Learning Objectives
Download and install the following software or register for the apps if you have not done so already.
Click on the links to go to the registration pages. Keep your login details for all sites/apps consistent and always use your real name.
📢Important
Real name
We recognise you may need to keep your birth name private. When we say real name, we mean the name you go by. It does not have to match your birth certificate or any other legal document. It has to be consistent and professional.
Every time you create an account which can have a profile picture, you should set one up. Follow these professional image guidelines when picking an image. Use the same picture for every account.
💡Robohash
Gmail, Google Account
Make a new Google account if you do not have a professional one already. What is a professional email address?
- Use your real name.
- Don’t use any numbers or words that are not your name.
- Never put the year of your birth or age in your professional email address.
Your email address should look something like this:
This is your public professional email address. Use it to sign up for all your professional accounts unless you can use your GitHub.
- I have made a professional Google account and Gmail address.
- I have explored the Google Suite, such as calendar, docs and spreadsheets.
GitHub
You will use GitHub to store your code and to collaborate with your peers. You have already made a GitHub account, but you need to check it is professional. You can change your username in your settings. You can add your professional email address in your settings too. (You can have more than one email address on your account.)
- My GitHub account shows my professional name
- I have added my professional email address to my GitHub account.
Sign up for LinkedIn. LinkedIn is the largest professional social network. You will use it to help you get a job and to advance your career.
Make a LinkedIn account. Use your real name. Sign in with Google. Connect with your cohort.
Your cohort is your first network, and this is one of the most valuable things you can develop at CYF . A strong, tightly linked, professional network is a powerful asset, so begin building it today.
- I have made a LinkedIn account using my professional email address.
- I have used my real name.
- I have connected with my cohort.
- I am following CYF .
Slack
Slack is our community space and how we communicate with each other. Download and install it now. If you are not using your own computer, log in to the web version instead.
- I have downloaded the Slack app on my computer and phone.
- I have logged in to the CYF workspace.
- I have found and joined my class channels.
- I have updated my profile with my picture, my professional email address, my GitHub username, my Linkedin profile and my class.
- I have introduced myself on Slack.
Applications
If you’re working on a library computer, you can’t download these applications. You will use GitHub Dev to complete coursework instead.
Google Chrome
- I have downloaded and installed Google Chrome.
- I have logged into my professional profile on Chrome.
Use your professional Chrome profile for all your CYF work. You will often have to share your screen during sessions, so keep your personal internet use private and away from your professional profile.
VSCode
We will use Visual Studio Code (VSCode), a professional IDE you will use on this course and at work.
- I have downloaded and installed Visual Studio Code.
Zoom
Usually we use Meet, but sometimes we use Zoom for remote sessions. Install it now.
- I have downloaded and installed Zoom onto my computer.
🏠 House Rules
Learning Objectives
Come on time when you’re learning
Many people give up their free time to teach us. They could be doing other things. We should respect this and always be on time.
Clean up after ourselves
Kind people let us use their space. We should keep it tidy and clean, just like our own homes.
Talk to each other (in English)
Put Slack on your phone and computer. Use it to ask for help and talk about classes. Speaking English helps everyone get better at it. Even if you know someone’s language, try to use English.
Learn to find answers yourself
We teach you how to look things up. Try to use Google to answer your own questions.
Use the computer yourself
Don’t let volunteers or peers type for you. Ask for help, but do the work yourself.
Help each other out
You’re all learning together. You can understand each other’s problems. Ask for help and offer it too. Explaining things to others helps you learn more.
We’re all part of this
This isn’t just a coding school. It’s for all of us - participants, trainees, volunteers. Try to make it better in any way you can.