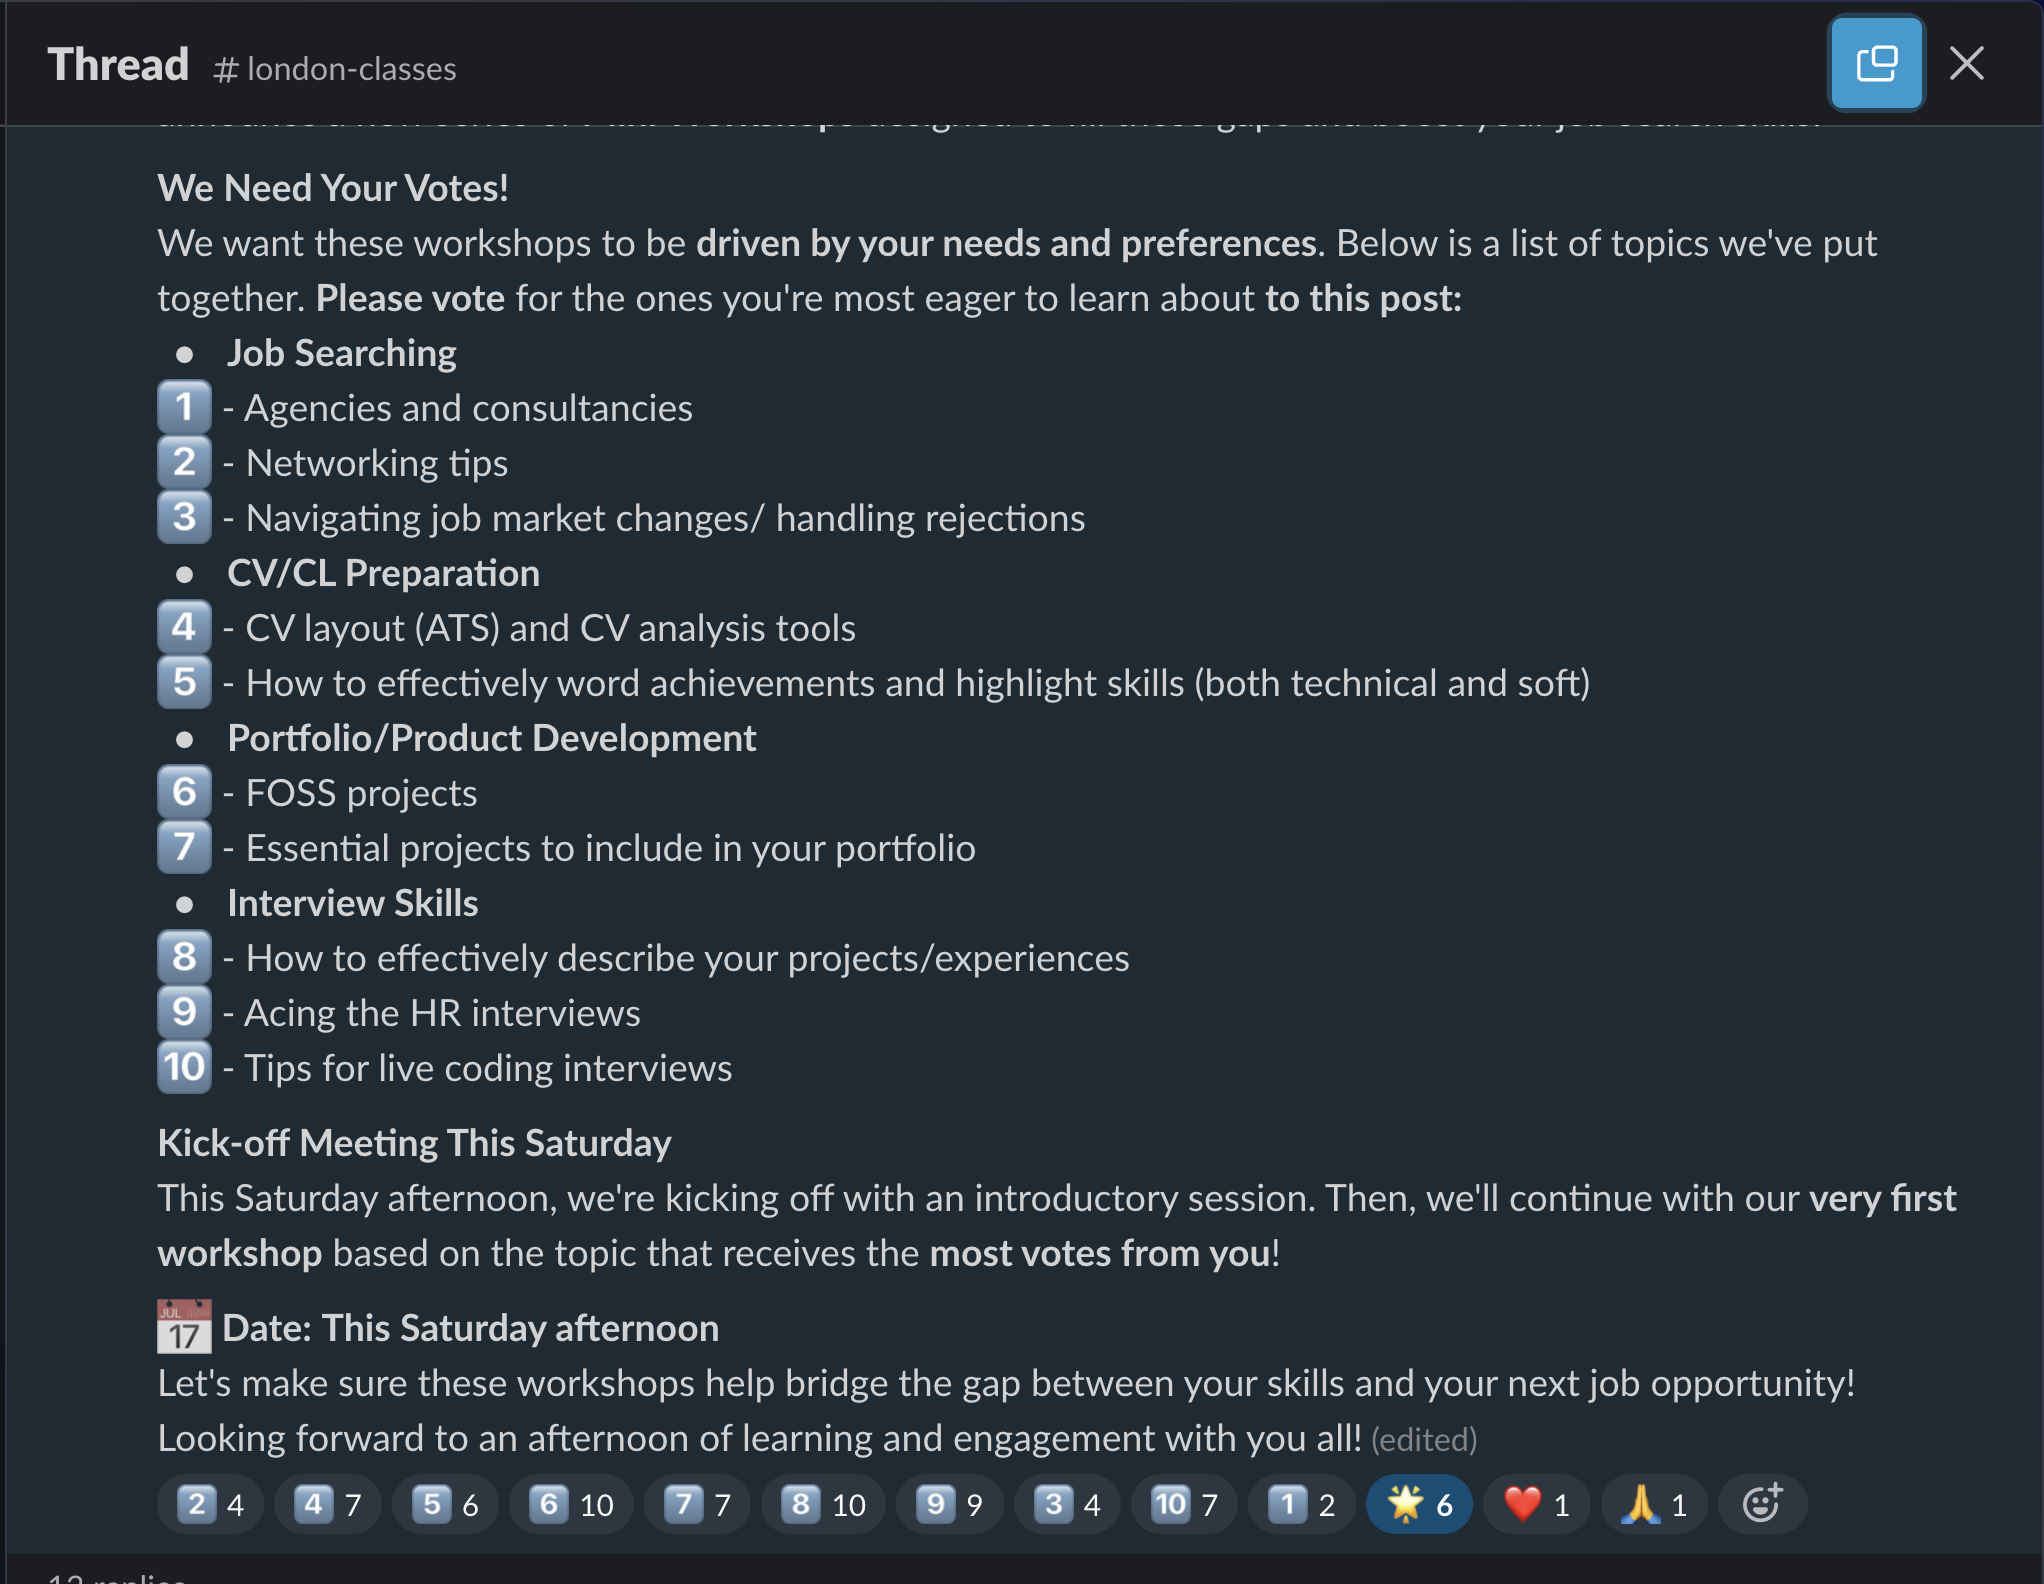
✍🏽 Register
🔋 Energiser
Every session begins with an energiser. Usually there’s a rota showing who will lead the energiser. We have some favourite games you can play if you are stuck.
- Traffic Jam: re-order the cars to unblock yourself
- Telephone: draw the words and write the pictures
- Popcorn show and tell: popcorn around the room and show one nearby object or something in your pocket or bag and explain what it means to you.
🎡 Morning orientation
Learning Objectives
Planning during the week
👣 Steps
If you haven’t done so already, choose someone (volunteer or trainee) to be the facilitator for this morning orientation block. Choose another to be the timekeeper.
🎙️ The Facilitator will:
- Assemble the entire group (all volunteers & all trainees) in a circle
- Briefly welcome everyone with an announcement, like this:
💬 “Morning everyone, Welcome to CYF {REGION}, this week we are working on {MODULE} {SPRINT} and we’re currently working on {SUMMARISE THE TOPICS OF THE WEEK}”
- Ask any newcomers to introduce themselves to the group, and welcome them.
- Now check: is it the start of a new module? Is it sprint 1? If so, read out the success criteria for the new module.
- Next go through the morning day plan only (typically on the curriculum website) - and check the following things:
Facilitator Checklist
- Check the number of volunteers you have for the morning
- Check someone is leading each session
- Describe how any new activities works for the group
- Decide how best to allocate trainees and volunteers for a given block - most blocks will make this clear
⏰ The Timekeeper will:
- Announce the start of an activity and how long it will take (check everyone is listening)
- Manage any whole class timers that are used in an activity
- Give people a 10-minute wrap-up warning before the end of an activity
- Announce the end of an activity and what happens next
🧰 Workshop Activity
Learning Objectives
This space is for a workshop activity of your choosing. In order for this to actually happen, you must organise it ahead of time.
What is a CYF workshop?
👷🏿♀️ No lectures
Code Your Future workshops are designed to be interactive. Developed by volunteers and trainees, they are not about listening to a lecture. They are about doing, discussing, and learning together.
💪🏾 No spoonfeeding
Workshops are also not tutorials, where you follow along step-by-step. CYF workshops are meant to expose gaps and mistakes in your understanding, so mentors can help you fix them. This means you should expect to be challenged and to make mistakes. This is the main value of mentor-led workshops.
👂🏿 Responding to needs
You can run a workshop in person on class days, or online in the week. Mentors volunteer to run workshops on Slack, and learners propose topics they need help with. There are a huge number of workshops available at workshops.codeyourfuture.io/.
Organise a workshop on Slack
🗂️ Options
Asking questions [PD] (60 Mins)
🔗 Asking questions [PD] (60 Mins)
Asking Questions 101
Prep
- Read this article about Mental Models
- Load this webpage, which stores the problems we will work on today. https://cyf-workshop.netlify.app/asking-questions
Today we’re going to start learning a formal language of developer questions. We will begin with this basic format:
- What I did
- What I expected
- What actually happened
This format helps to find the discrepancies between expectations and reality. (This is the gap in our understanding.)
It’s also an efficient way to share our current understanding with others.
Expectation vs reality
When we are surprised by an outcome it usually means we had a mental model of the world that didn’t predict the world accurately. Don’t panic when this happens, it’s completely expected for even experienced developers to run into surprises. We use these gaps as signs that we need to update our mental models.
To develop our understanding of coding, we will:
Predict & Explain
- Make a prediction by explaining what the outcome will be
- Play computer - “run” the model in our heads and predict (say before) what the outcome will be
Try
- Code up our idea
- Run the code
Compare and Update
- Compare the outcome with our prediction
- Explain the gap between our prediction and what actually happened
- Update our understanding
This process is cyclical.
Updating the right model
If you are stuck and can’t explain the gap in your mental model, then it’s time to ask a question!
When we ask questions, it’s important that we share our current mental model as part of your question so that other people can test the right thing, focus on the mis-understanding. Then together you can get quickly to a shared understanding of your specific problem.
Let’s look at how asking questions helps you update your mental model with an example.
🕹️Inversion, 5m
- Set a timer for 5 minutes.
- Popcorn around the room and each person give an example of a bad way to ask a question until the timer goes off. For example:
Argh I can’t make it work please help me!
Why are these not useful?
🕹️Inversion 2, 10m
- Set a timer for 10 minutes.
- Popcorn around the room and each person give a reason that one of the previous questions was bad until the timer goes off. For example:
What is it? What are you trying to do? In what way is it not working? Be specific! Share what you see. Do you have a link? What do you want it to do?
Exercise ground rules
Before we get to the next exercise, let’s just set some ground rules here:
- The goal is not to complete the exercise; the goal is to learn
- The smart thing to do is to focus on the questions you cannot (yet) answer
🕹️Framing questions systematically, 30m
Split into groups of 2-5 people. Set a whole class timer for 30 minutes.
Confound yourselves
- Pick a problem from the bank.
- As a group, make a prediction about what you think the answer is, and write it down.
- Test your prediction. Try it out using the dev tools.
- Compare your prediction with the outcome.
What happened? Is there a gap in your understanding?
Keep doing this until you find a problem you can’t solve, then write up your mental model using this format:
- What I did
- What I expected. Make sure you include your prediction here
- What actually happened
Include as much context as you can, including links, line numbers, sample code, etc. Use code blocks to mark up your code. If you use screenshots, they should only show the visual render (never screenshot code - paste code as text).
Now post your write up of the question in #cyf-ask-tech-stuff.
🧑🏾💻🙋 Developer questions contain
- 🔗 Links 👍
- Objectives - what are you actually trying to do? 👍
- 🖼️ Screenshots of UI 👍
- 📝
Code blocks👍 - 📷
Screenshots of code🙅
📚 Further reading
Devtools [Tech] (60 Mins)
🔗 Devtools [Tech] (60 Mins)
Learning Objectives
Inspector Gadget
Prep
For this workshop you will need:
- Chrome with Devtools
- A ChatGPT account
- This Devtools Workshop page
- Someone to keep track of the timer for each activity
You’ve already used a little bit of Devtools in ITD when you used Lighthouse to audit your code. But there’s much much more! Devtools is an entire IDE (Integrated Development Environment) running inside your browser and it has hundreds of ways to inspect, test, and develop your code.
💡Explore
Inspect the DOM
✍️Explore
In groups of no more than five. Take it in turns to swap the driver for each section of this workshop
Inspect the page with Devtools.
Write down the answers to these questions:
- What is the name of the font used on the page?
- What is the CSS variable that holds this value? (Hint: variables start with
--, like,--paper) - What is the brand colour value (Hint: it’s set in a variable)?
- What is the brand colour value used for in the page?
- What variables hold CSS length data type values?
When the timer goes off, share your answers with the other groups. Paste them in a thread in Slack and go quickly to the next challenge.
So we’ve seen that fonts, colors, and spacing are often stored as CSS Variables, or custom properties. This allows them to be easily changed throughout a project by simply altering one value. Let’s experiment with this.
✍️Experiment
- Set a whole class timer for 10 minutes.
- Inspect the CSS of the page with Devtools.
- Find the CSS Variables (hint: variables start with
--, for example,--paper) - Try changing the values of these variables and see how it affects the page.
- Some questions to answer. (Make a prediction about what you think will happen first, and then test it)
- What will happen when you click the value of
--fingerand pressup arrowten times? - What will happen when you delete the value of
--copy - What will happen when you change the value of
--spacetored?
Reflection
When the timer goes off, set a new timer for 10 minutes to share your answers with the other groups.
Grid Inspector
Next, let’s see how the page layout is handled. Modern websites use the CSS Grid for layout and you can manipulate grids with Devtools.
✍️Grid Editor
- Set a whole class timer for 10 minutes.
- With Devtools, locate a grid element on the workshop page.
- Activate the Grid Badge in the Elements panel.
- Use the Grid Editor to try changing the layout.
- Go straight to the next challenge!
Lighthouse
It’s important that software works and that people can use it. Lighthouse can help you write code correctly by pointing out your errors. But even better, it can teach you to fix the errors.
✍️Audit
- Set a whole class timer for 10 minutes.
- Run a Lighthouse audit on the workshop page.
- Look at the results and identify the issue.
- Now, how will you fix it? Click on the error. Lighthouse explains what is wrong and provides a link to a detailed explanation on why it’s wrong, how serious it is, and how to fix it!
- If you have time, fix the error, but in any case, once the timer goes off, paste the link to the detailed explanation page into the workshop thread in Slack.
- Go straight to the next challenge, after which we will spend some time discussing what we discovered.
Hover for more
In fact Devtools is a great teacher. In the Styles panel, hover over any CSS property to get a quick definition of that property. Click ‘Learn More’ to go straight to the MDN page for that property.
If the explanation doesn’t make sense to you, ask ChatGPT (a generative AI) to explain it further.
⚠️Plausible Hallucinations
Remember: Generative AIs are regularly confidently wrong; it can be helpful, but never trust it over Devtools.
If something doesn’t make sense, or seems confusing or maybe wrong, it’s better to ask friendly humans in Slack.
✍️Explore and Explain
- Set a timer for 10 minutes.
- Select
<main>in the Elements panel - Hover over the ruleset attached to main in the Styles panel.
- Copy the Devtools explanation and ask ChatGPT to explain it, like this:
Please explain this to me like I'm a beginner learning HTML and CSS.
Determine a grid item’s size and location within the grid by contributing a line, a span, or nothing (automatic) to its grid placement. Shorthand for ‘grid-row-start’, ‘grid-column-start’, ‘grid-row-end’, and ‘grid-column-end’.
- Come back together as a large group.
Reflect
✍️Reflect
- Set a timer for 5 minutes.
- Spend five minutes discussing what you will share with the rest of the class about your experiments so far. What was a surprise to you? What will you use regularly from now on? What confused you? Elect one person to represent your group.
- Set a timer for 20 minutes.
- Popcorn round the representatives and share your findings. We’re not done yet so keep to time.
Many ways of examining the same thing
So we’ve explored the Elements panel, the Styles panel, and the Lighthouse panel. There are many many more panels, and they all expose a different way of interpreting, interacting with, or understanding the same code. Computer systems frequently do this. It’s a mistake to think that the way you use a website is the only way it can be used. Bots, crawlers, screenreaders, integrations…there are many and various consumers of your code, so it’s important to make sure you construct it properly.
For example, you have just looked in the Elements panel. This is not really your HTML, this is the DOM, an API the browser builds using your HTML. An example of how the DOM is different from HTML is that JavaScript can change what’s in the page - this changes the DOM, but doesn’t change the actual HTML. The DOM isn’t the only API it builds. Let’s look at another one right now!
✍️A New Lens
- Set a timer for 5 minutes.
- Find the Accessibility Panel and check ‘Enable full-page accessibility tree’
- Now click the “Universal Man” button in the Elements Panel.
- What is Ignored in the Accessibility Tree that is present in the DOM?
- When the timer goes off, share your answer with the other groups by pasting in the workshop thread.
Reflect
✍️Develop Your Skills
- Set a timer for 10 minutes.
- Discuss how your team will work on developing your skill with Devtools. Make your goals SMART. For example, you might audit a website you have built already with Lighthouse and improve its score using the guides. You might schedule a study group where each person researches and then teaches the group about a different panel in Devtools.
- Write down your learning goals with Devtools on a piece of paper and sign it underneath. Elect a new person to represent your group.
- Set a timer for 10 minutes.
- Popcorn round the representatives and share your commitments.
And that’s it for today! We have covered a lot, but remember, as developers, we are lifelong learners. Always be curious and don’t be afraid to explore new tools and concepts. Soon we’ll dive even deeper into Devtools, so make sure to keep exploring.
More
Inspect web pages as you use the internet. Do this all the time! What font does Youtube use? What about CSS Tricks? Hackernews is still using tables - what’s wrong with this?
Try changing the style and content of some websites. Make your favourite website bright pink. Make the BBC News page tell people about something great you did. Send a screenshot of something cool you changed to your cohort’s Slack channel.
There are crash courses in Devtools all over YouTube and Udemy etc. Find a useful tip and share it in your class channel.
Components 1 [Tech] (60 Mins)
🔗 Components 1 [Tech] (60 Mins)
Learning Objectives
First Components
Today we’re going to think about components. We’re going to build a page using a design system and we’re going to collaborate on a feature branch workflow.
The overall mission is to compose “components” / groupings of HTML elements to re-build this web page: CYF Components Workshop.
Requirements
Before you start, make sure you’ve installed the CYF Extension Pack in VS Code.
🕹️Set up your feature branch 15m
Set up your feature branches
Divide the class into three teams: header, footer, card. Use the team generator to help you do this.
Set a whole class timer for 10 minutes.
Each team, choose a driver
- Driver, clone this repository
- Driver, create and checkout a new branch for your team named like this:
feature/cohort-component, where cohort is your cohort name and component is the component you’re building, for example:feature/nw6-header
git switch --create feature/cohort-component
Now you’re all set up to make changes to together.html.
🕹️Find your docs 10m
Find your docs
Set a whole class timer for 10 minutes.
Deployed from this repo is a mini design system. This design system has several documented components: card, header, and footer. Each component view has some sample code and some statements about the components.
Your mission is to find the docs for your component and read them.
Together separately
Set a whole class timer for 30 minutes.
🕹️Parallel Development 30m
Now build your component. Elect a new driver.
- Find together.html in the /components-1 directory. Your mission is to complete this page.
- In the correct portion of the page, make your changes to build your feature on together.html.
- Driver, commit your changes to your feature branch.
- Open a pull request from your branch to main, with your changes.
- Remember, docs will help you.
- Do the simplest thing that could possibly work to begin with. You can always update your PR with more changes.
Review and merge
Now we’re going to review each other’s work. If a mentor is available, they can be the driver for this part and you can actually merge your PRs. If not, please don’t try to merge as you could make a mess of this shared repo.
Note to mentor: please revert together.html to the initial commit after you’re done so the next class can use it. (Or if your group has time for it, you can merge on a fork instead.)
Set a whole class timer for 30 minutes.
🕹️Review 30m
- Go to the pull requests for this repo.
- Either individually or as a group, review each other’s PRs.
- Once you’re all happy with the PR, merge it.
- Did it work? Why/why not? Discuss.
Acceptance Criteria
- We have worked in three teams to build a page using a design system
- We have used a feature branch workflow to collaborate
- We have reviewed each team’s PR
🍽️ Community Lunch
Every Saturday we cook and eat together. We share our food and our stories. We learn about each other and the world. We build community.
This is everyone’s responsibility, so help with what is needed to make this happen, for example, organising the food, setting up the table, washing up, tidying up, etc. You can do something different every week. You don’t need to be constantly responsible for the same task.
🛗 Study Group
Learning Objectives
What are we doing now?
You’re going to use this time to work through coursework. Your cohort will collectively self-organise to work through the coursework together in your own way. Sort yourselves into groups that work for you.
Use this time wisely
You will have study time in almost every class day. Don’t waste it. Use it to:
- work through the coursework
- ask questions and get unblocked
- give and receive code review
- work on your portfolio
- develop your own projects
🛎️ Code waiting for review 🔗
Below are trainee coursework Pull Requests that need to be reviewed by volunteers.
Module-Onboarding/Millena Mesfin/Feature-Wireframe/Week#1 🔗
Learners, PR Template
Self checklist
- I have committed my files one by one, on purpose, and for a reason
- I have titled my PR with COHORT_NAME | FIRST_NAME LAST_NAME | REPO_NAME | WEEK
- I have tested my changes
- My changes follow the style guide
- My changes meet the requirements of this task
Changelist
Briefly explain your PR.
Questions
Ask any questions you have for your reviewer.
Start a reviewCYF Glasgow Dalila Boumezrag | Module-User-Focused-Data | week 2 🔗
Learners, PR Template
Self checklist
- [ Done] I have committed my files one by one, on purpose, and for a reason
- [Done] I have titled my PR with COHORT_NAME | FIRST_NAME LAST_NAME | REPO_NAME | WEEK
- [ Done] I have tested my changes
- [ Done ] My changes follow the style guide
- [ Done] My changes meet the requirements of this task
Changelist
Briefly explain your PR.
Questions
Ask any questions you have for your reviewer.
Start a reviewCYF_Glasgow | Mansoor Munawar | Module-User-Focussed-Data | Week 1 - Form controls 🔗
Learners, PR Template
Self checklist
- I have committed my files one by one, on purpose, and for a reason
- I have titled my PR with COHORT_NAME | FIRST_NAME LAST_NAME | REPO_NAME | WEEK
- I have tested my changes
- My changes follow the style guide
- My changes meet the requirements of this task
Changelist
Briefly explain your PR.
Questions
Ask any questions you have for your reviewer.
Start a review🫖 Afternoon Break
Please feel comfortable and welcome to pray at this time if this is part of your religion.
If you are breastfeeding and would like a private space, please let us know.
🛗 Study Group
Learning Objectives
What are we doing now?
You’re going to use this time to work through coursework. Your cohort will collectively self-organise to work through the coursework together in your own way. Sort yourselves into groups that work for you.
Use this time wisely
You will have study time in almost every class day. Don’t waste it. Use it to:
- work through the coursework
- ask questions and get unblocked
- give and receive code review
- work on your portfolio
- develop your own projects
🔄 Retro: Start / Stop / Continue
🕹️Retro (20 minutes)
A retro is a chance to reflect. You can do this on RetroTool (create a free anonymous retro and share the link with the class) or on sticky notes on a wall.
- Set a timer for 5 minutes. There’s one on the RetroTool too.
- Write down as many things as you can think of that you’d like to start, stop, and continue doing next sprint.
- Write one point per note and keep it short.
- When the timer goes off, one person should set a timer for 1 minute and group the notes into themes.
- Next, set a timer for 2 minutes and all vote on the most important themes by adding a dot or a +1 to the note.
- Finally, set a timer for 8 minutes and all discuss the top three themes.